1. The cashier can select menu book by season
1. The cashier can select menu book by season
Purpose:
Currently, when changing the menu by seaon, the restaurant cannot choose the time to apply but must wait for the set date to change, causing inconvenience. Therefore, as of R101, CUKCUK has added a feature to help cashiers choose the sales menu and quickly take orders with PLU.
Instruction steps:
Details of change:
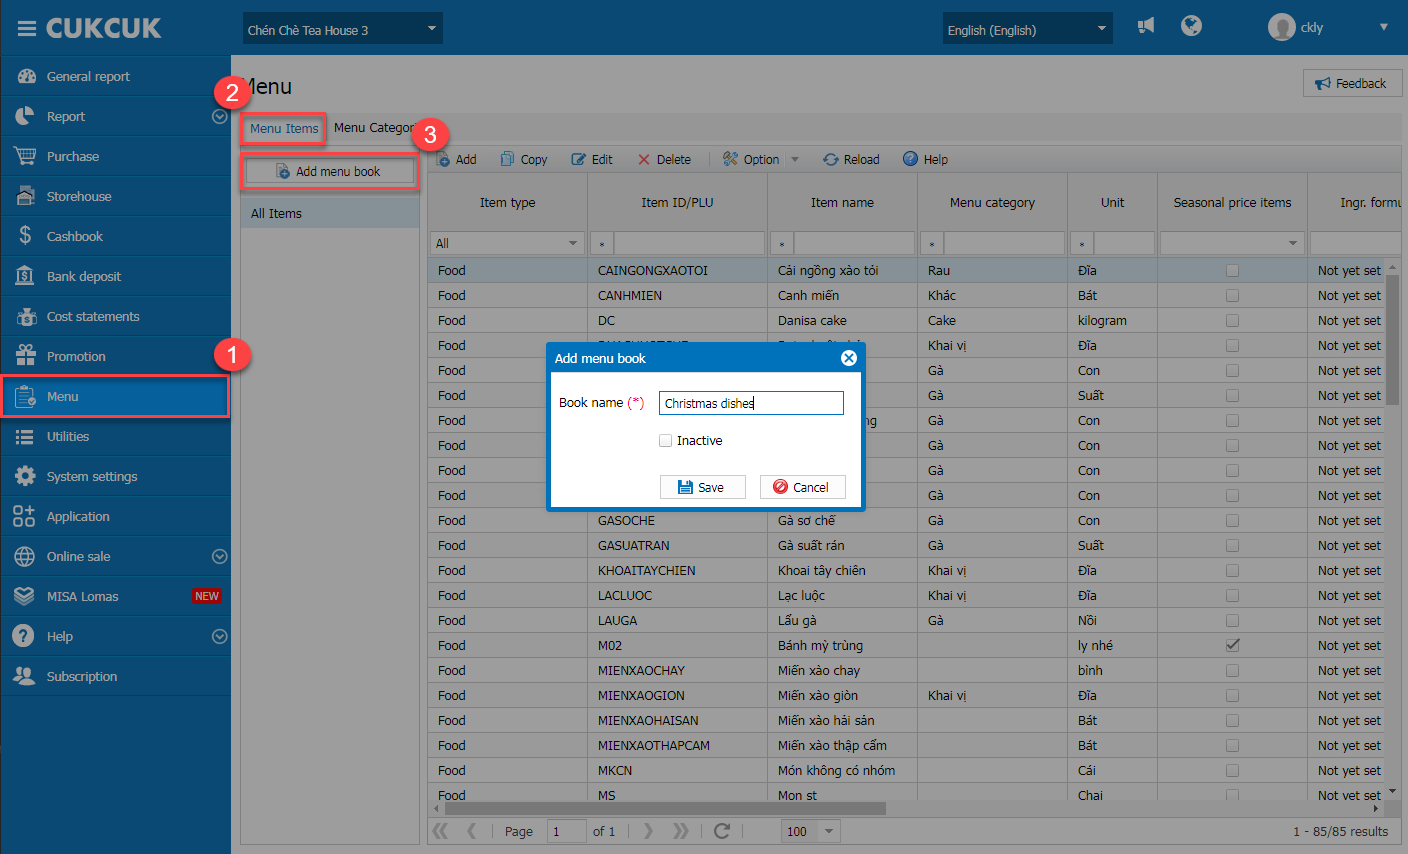
On the management page, go to Menu and select Add menu book
On Add menu book screen, enter menu name. Then, click Save.
Note:
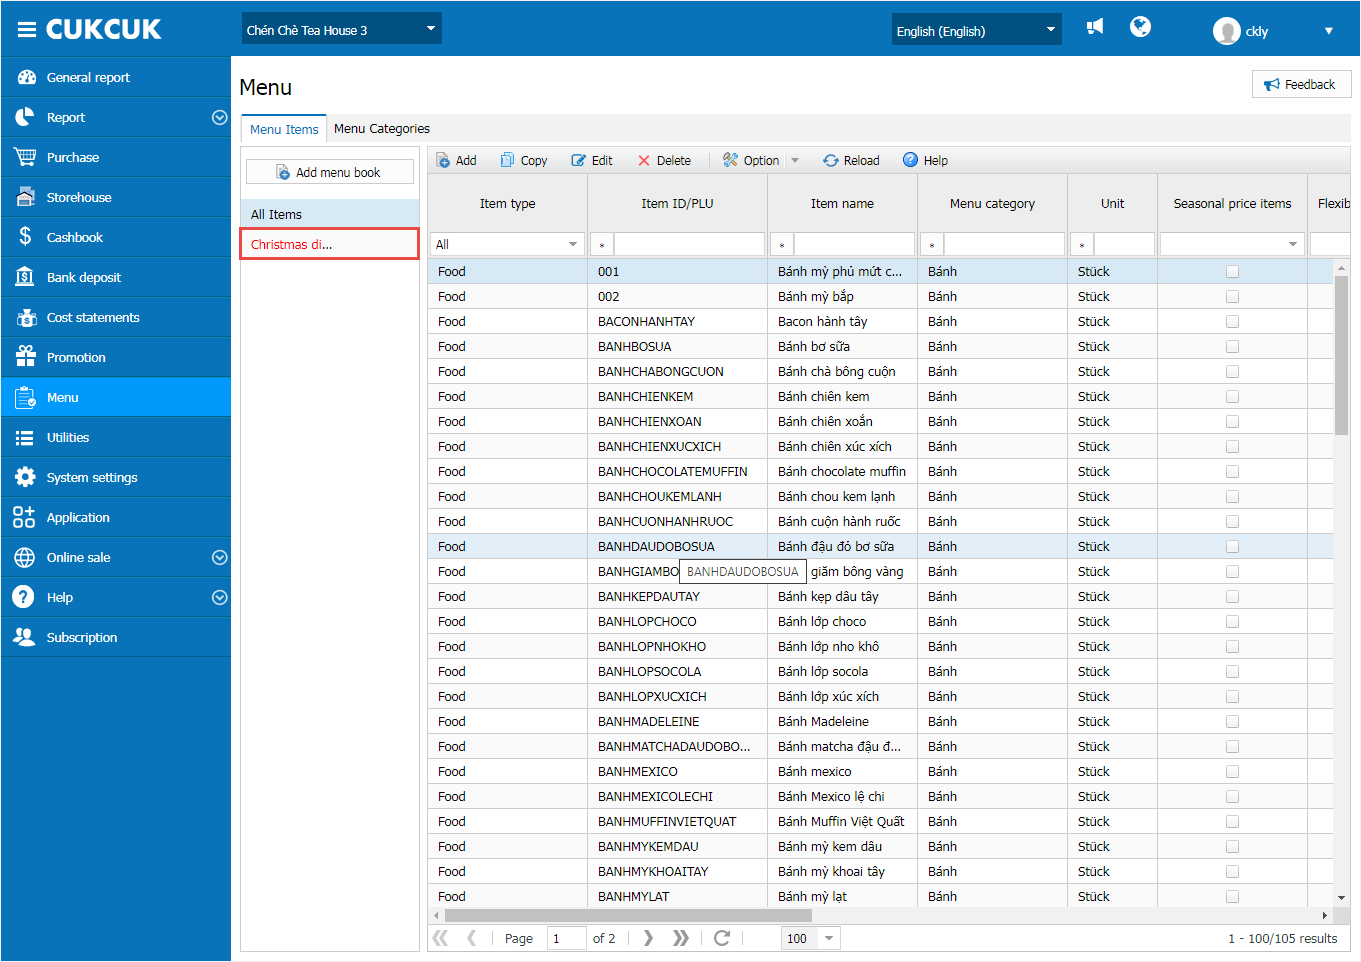
– If the manager checks Not yet set up, the menu book will be in red on the management page and will not be shown on PC/Quick service.
– Click on the icon![]() , the screen shows 2 options: Select from list or Add new item
, the screen shows 2 options: Select from list or Add new item

Option 1: Select menu from the list
On Apply to item screen, please follow these steps:
Step 1: Set up menu
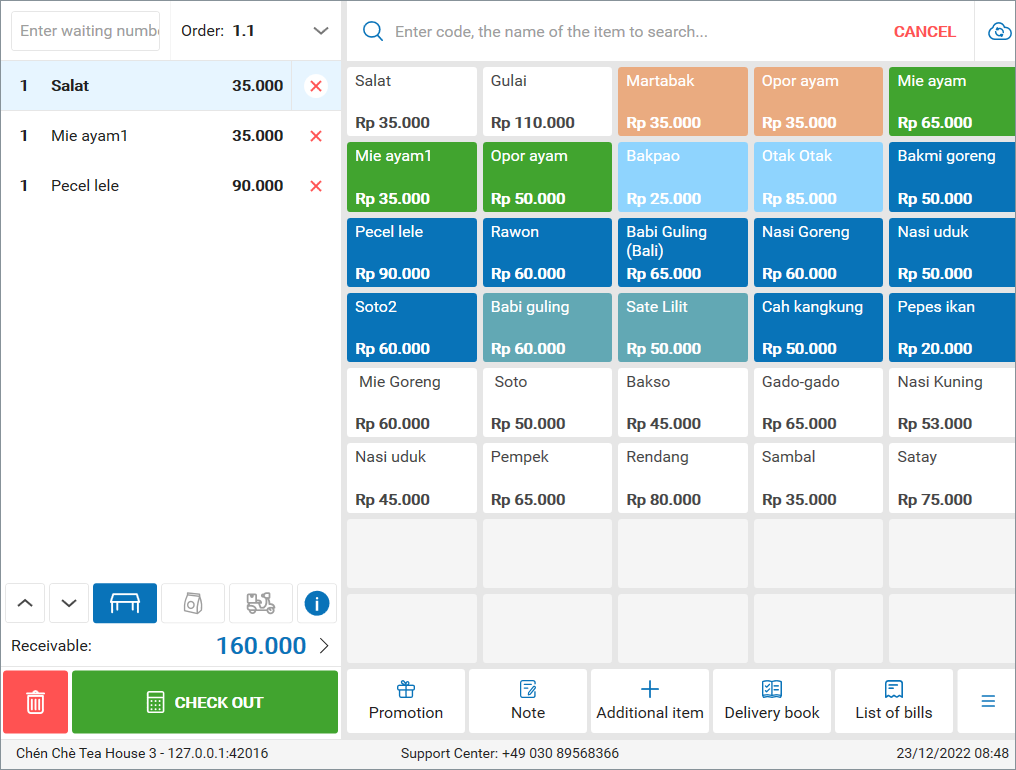
– Click on the icon![]() to select menu category (or search item name by entering item ID or name)
to select menu category (or search item name by entering item ID or name)
– Click Load data
– Moreover, the manager can quickly select items to shown on the screen.
– Click on the icon![]() to select item.
to select item.
Then, click Next

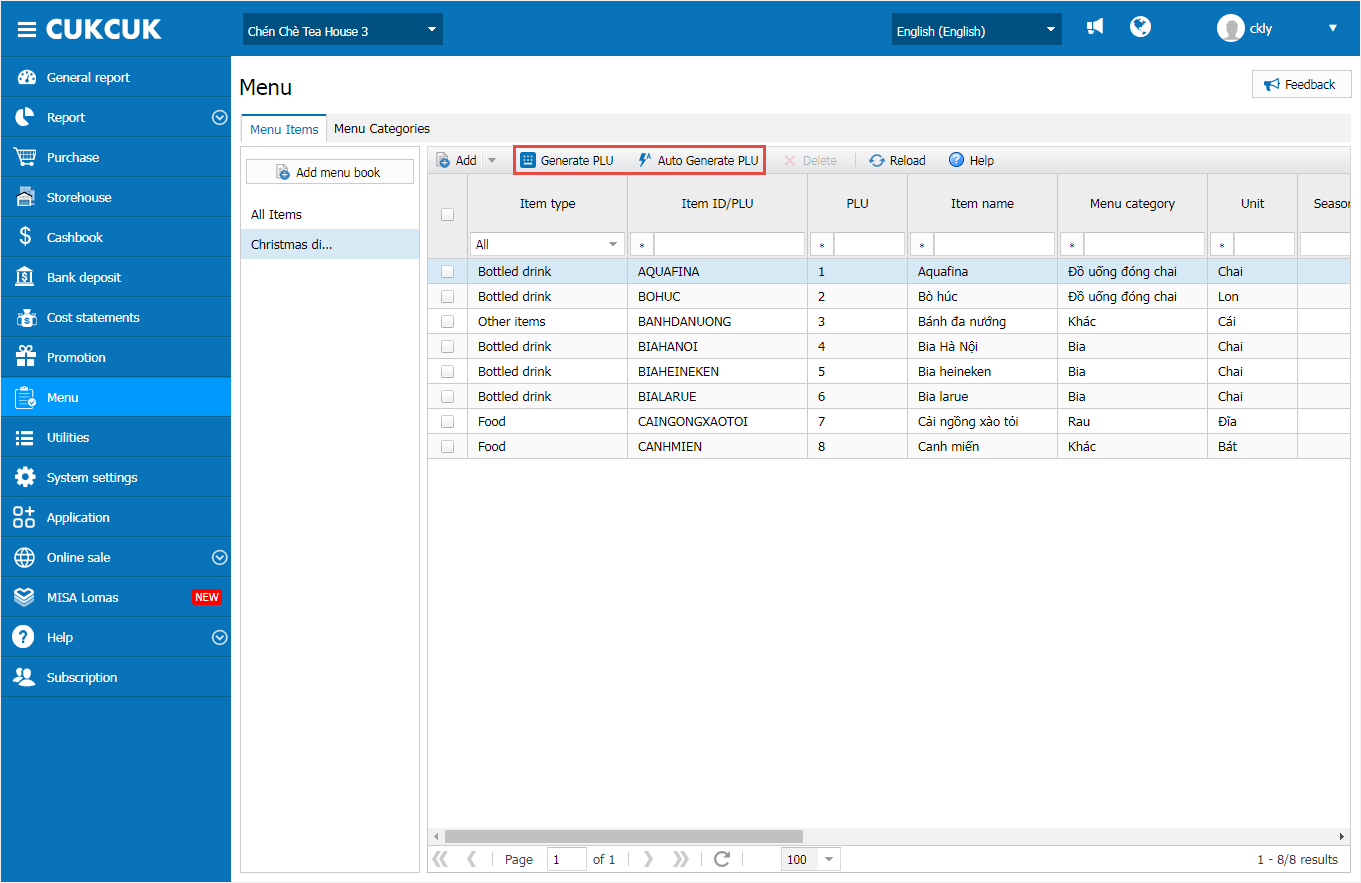
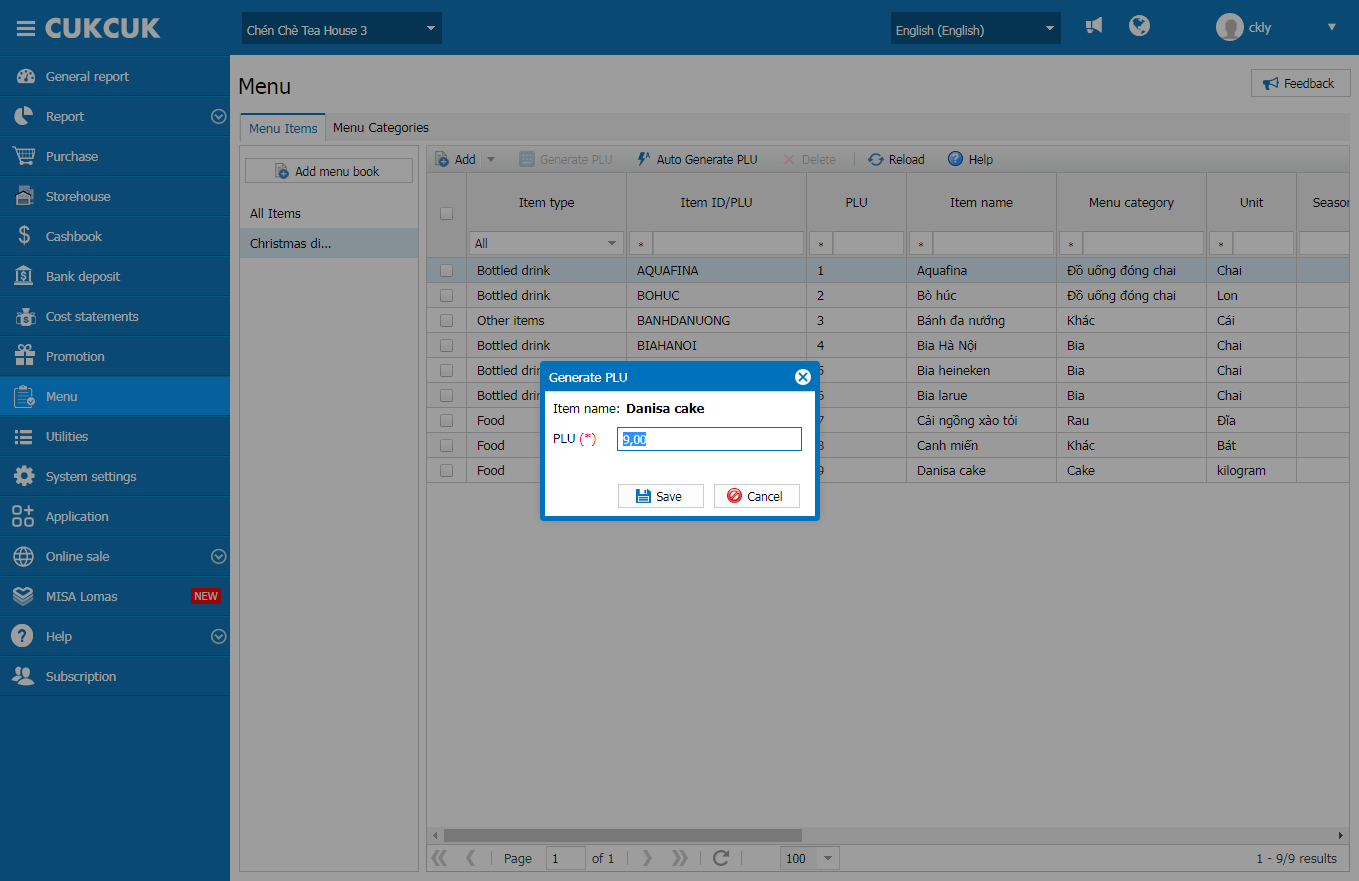
Step 2: Generate PLU
At Generate PLU, select Menu and check Auto generate PLU.
Then, click Next
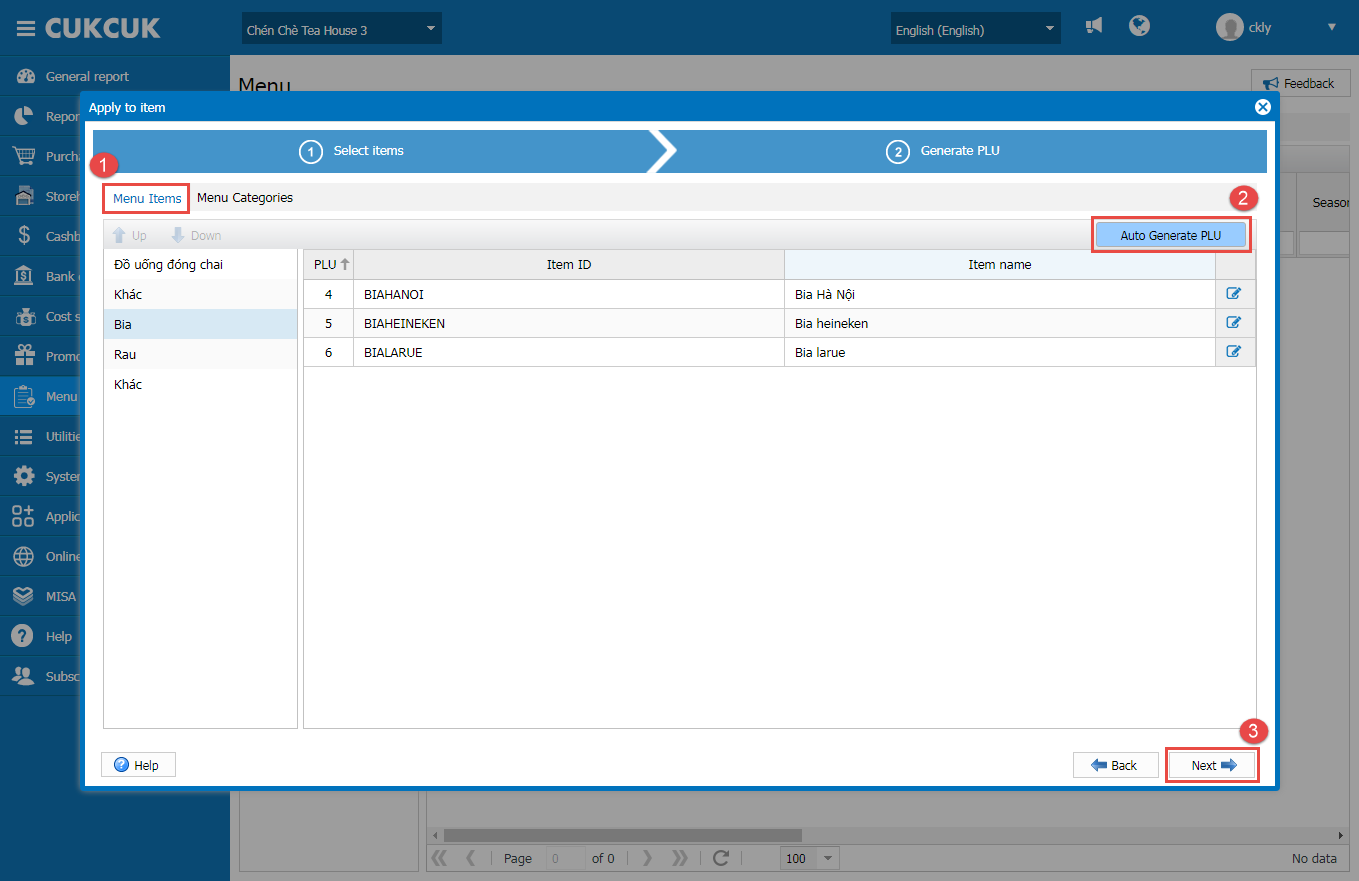
Note: If the manager has not set up Generate PLU, on this screen you can select Generate PLU or Auto generate PLU as below.
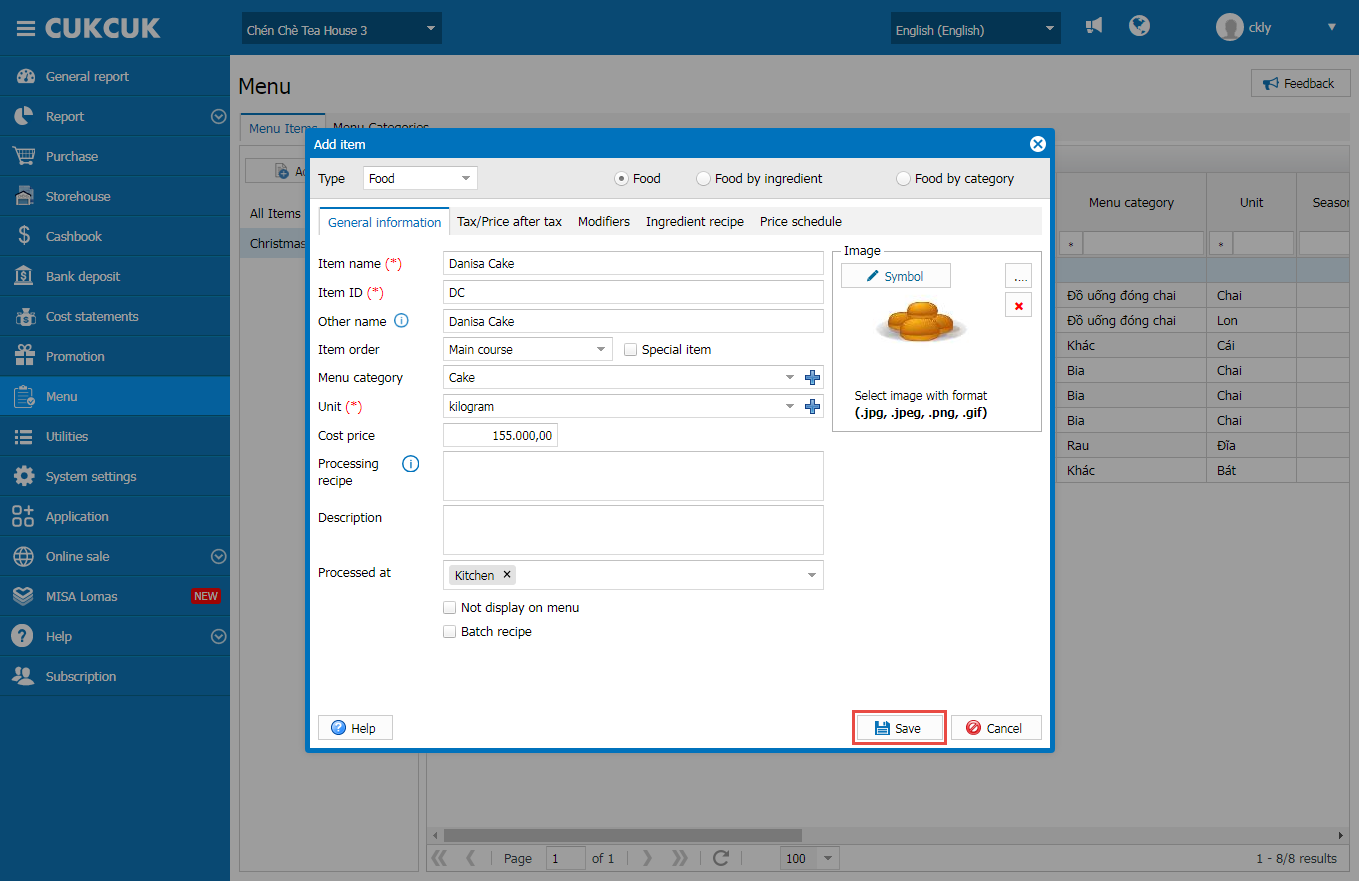
Option 2: Add item
Details of adding new items are here
After adding item and clicking Save, Generate PLU window will appear as below.
- Click Save to complete
– Click on the icon![]() and select Menu/Menu book
and select Menu/Menu book
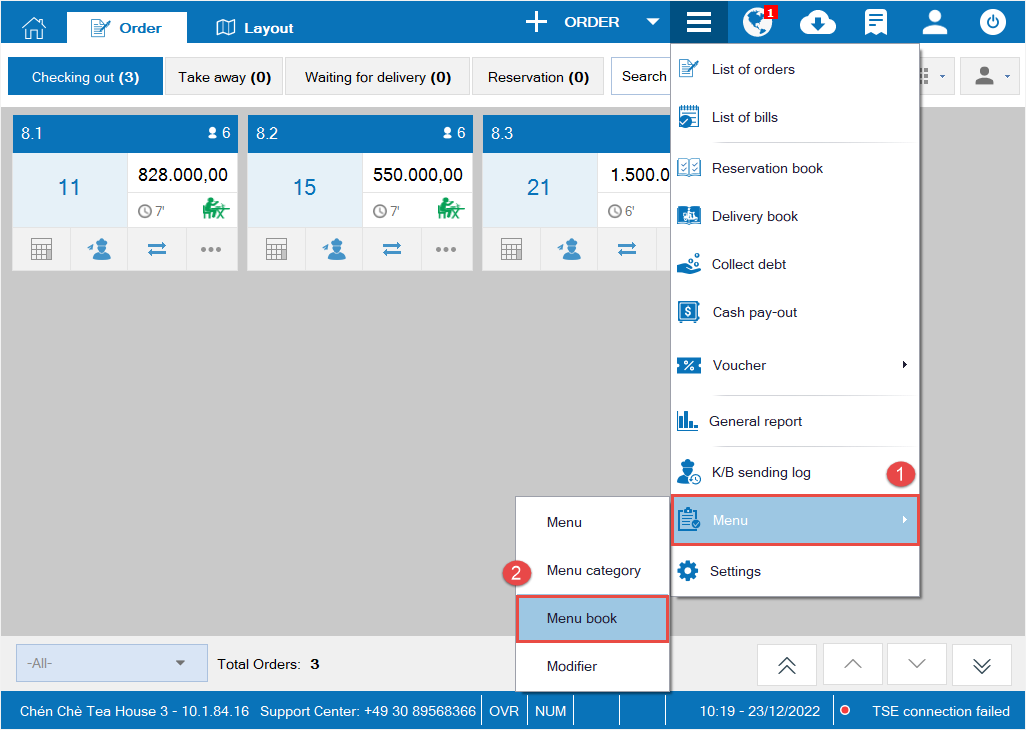
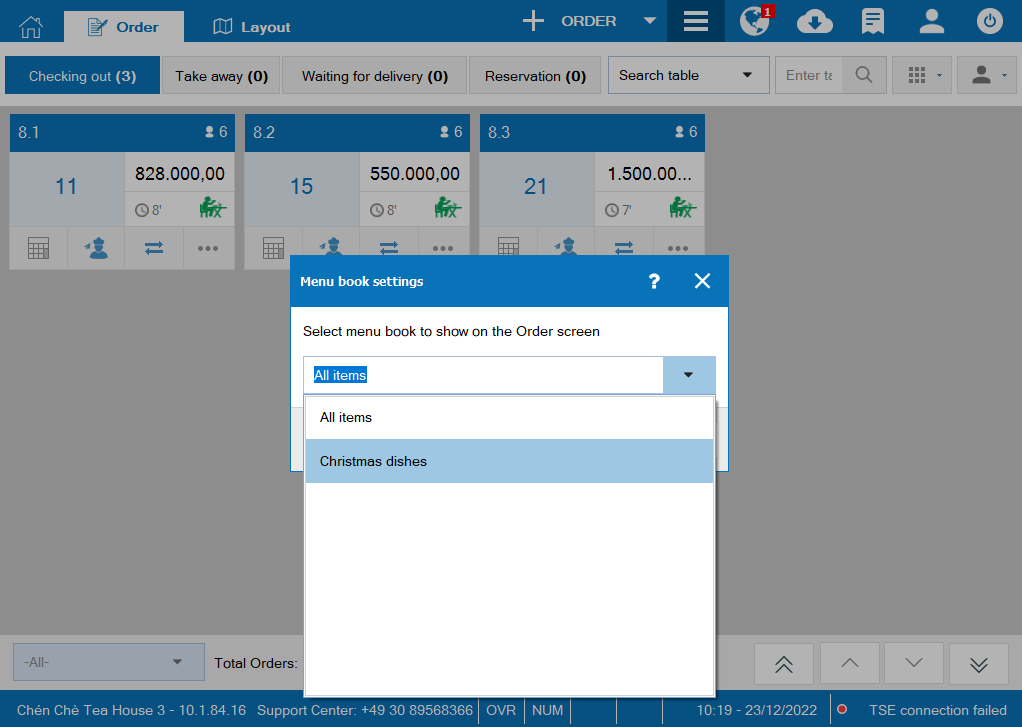
On Menu book settings screen, click on the icon![]() and select the menu book to show on the Order screen
and select the menu book to show on the Order screen
Then, click Save
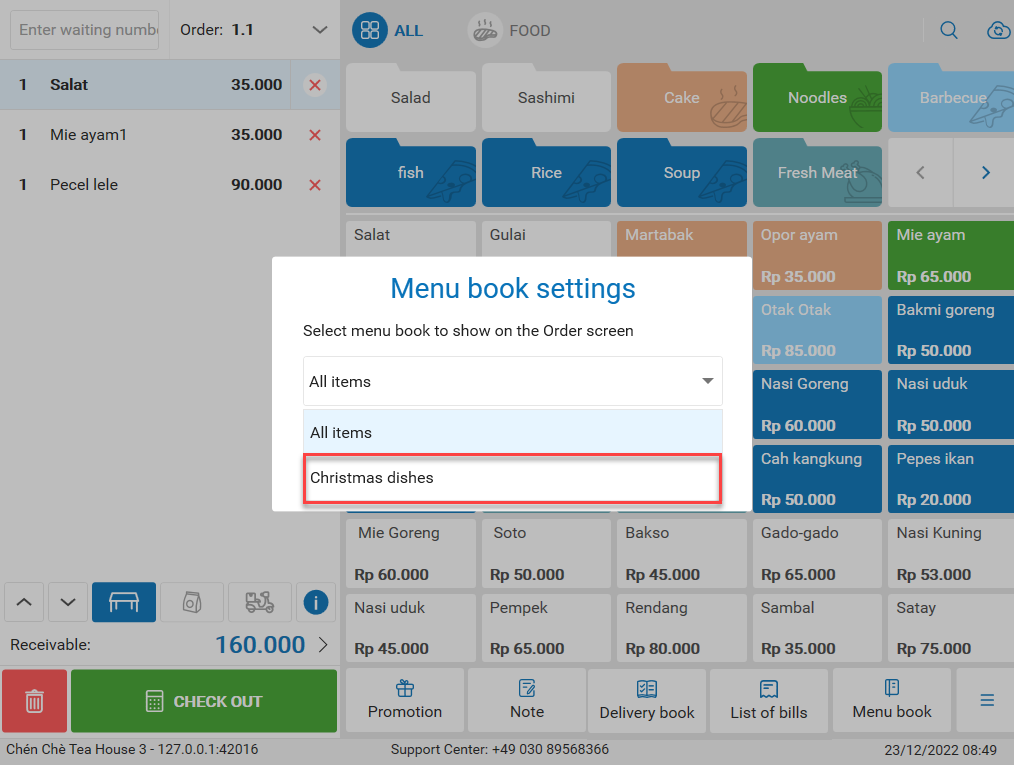
– Click on the icon![]() and select Menu book
and select Menu book
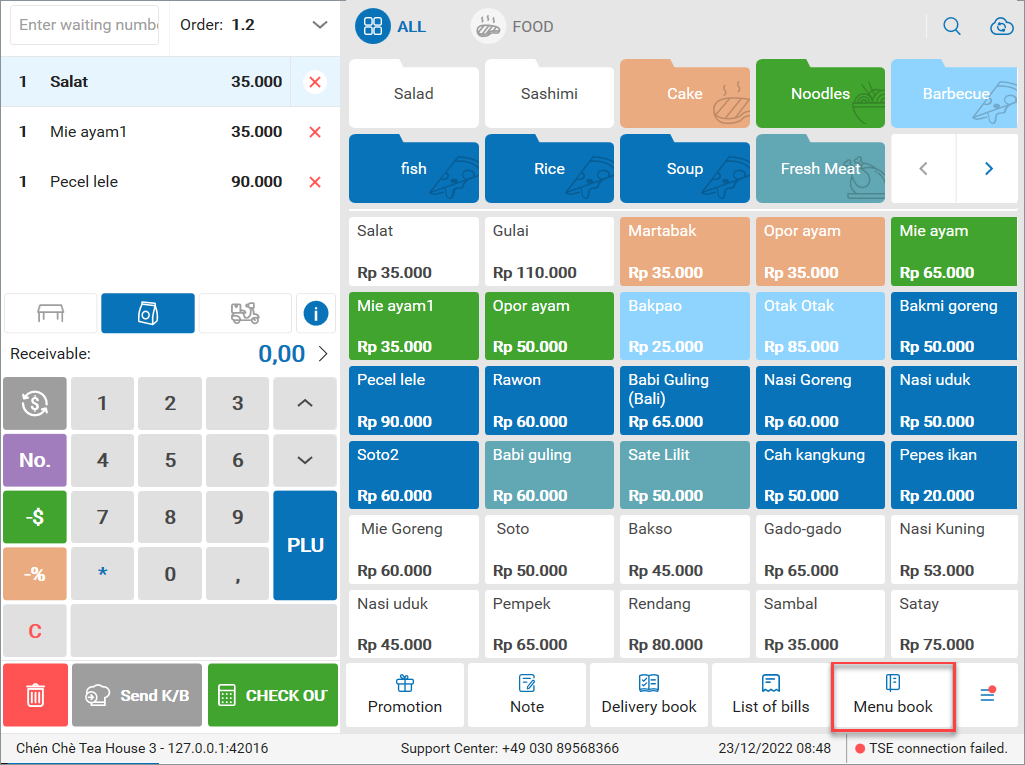
On Menu book settings screen, click on the icon![]() and select menu book to show on the Order screen
and select menu book to show on the Order screen
Then, click OK
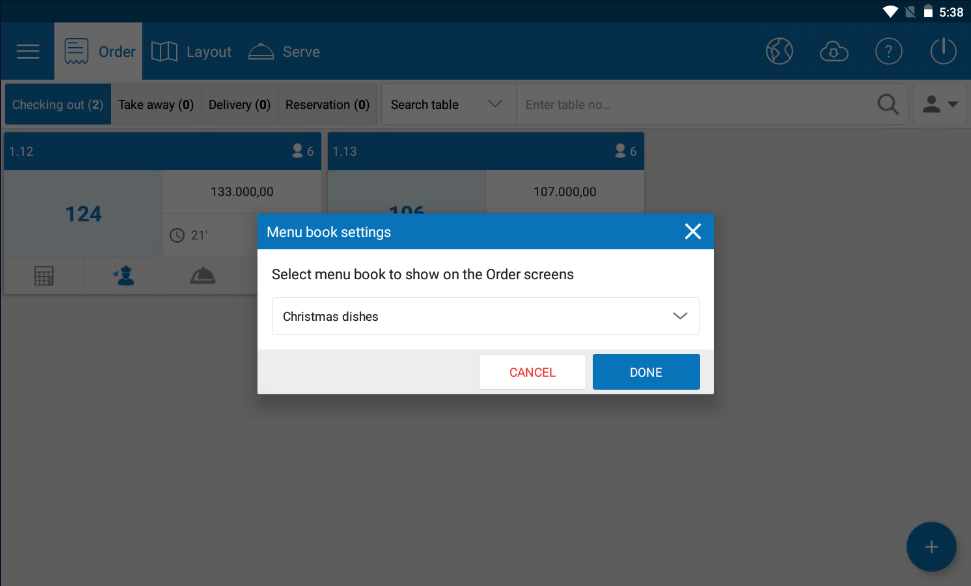
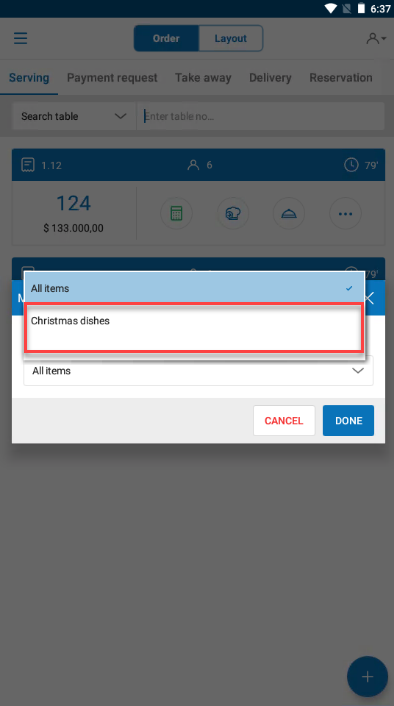
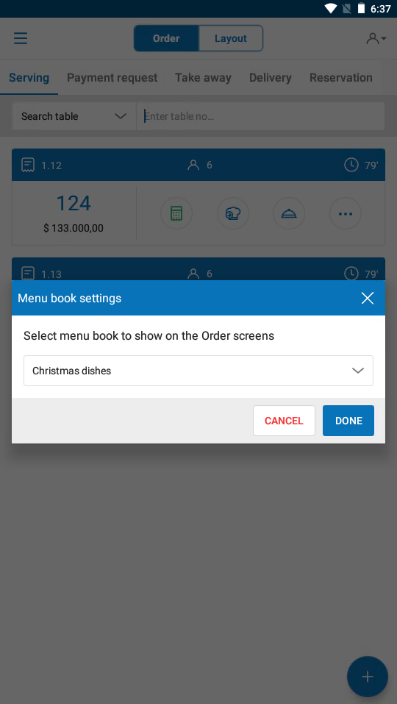
1.4.1. On Tablet
– Click on the icon
![]() and select Menu book settings
and select Menu book settings

On Menu book settings screen, click on the icon
![]() and select menu book to show on the Order screen
and select menu book to show on the Order screen
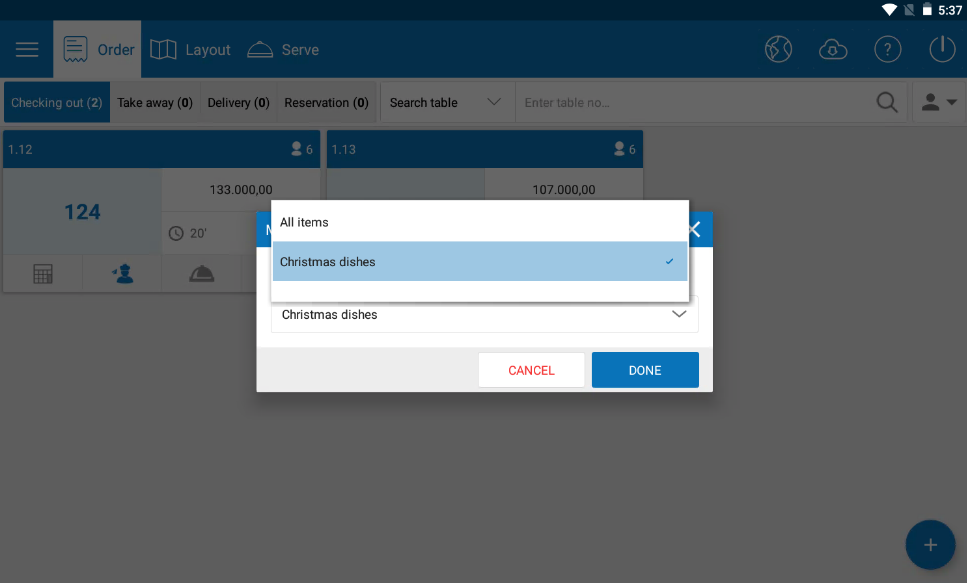
Then, click Done
1.4.2. On Mobile
– Click on the icon
![]() and select Menu book settings
and select Menu book settings
On Menu book settings screen, click on the icon
![]() and select menu book to show on the Order screen
and select menu book to show on the Order screen
Then, click Done
Details of change:
Currently, when the guests buy vouchers issued at a restaurant branch, they can only use vouchers at that branch. Therefore, as of R101, the software allows to set up to use vouchers at all branches of the restaurant.
Instruction steps:
Step 1: Set up to use vouchers in the whole chain
On the management page, at Restaurant chain select System settings/General information
– Click Edit and check Voucher applied to all

– Then, click Save

Note: The manager can only change the setting once after checking Voucher applied to all.
Step 2: Set up to top up and refund voucher
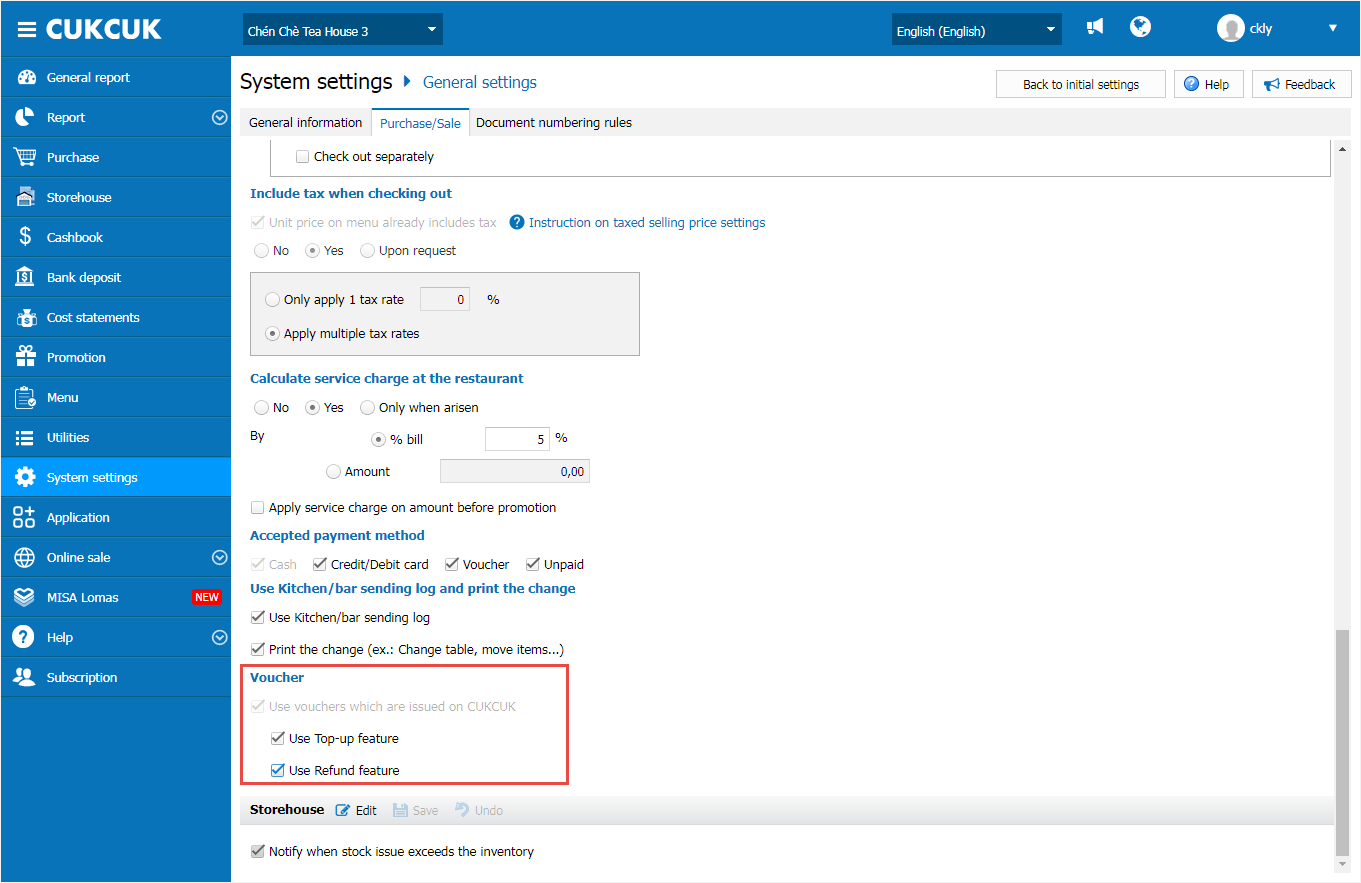
On the management page, at each branch select System settings/ General settings/Purchase\Sale
– Go to Voucher and check Use top-up feature and/or Use refund feature
Then, click Save
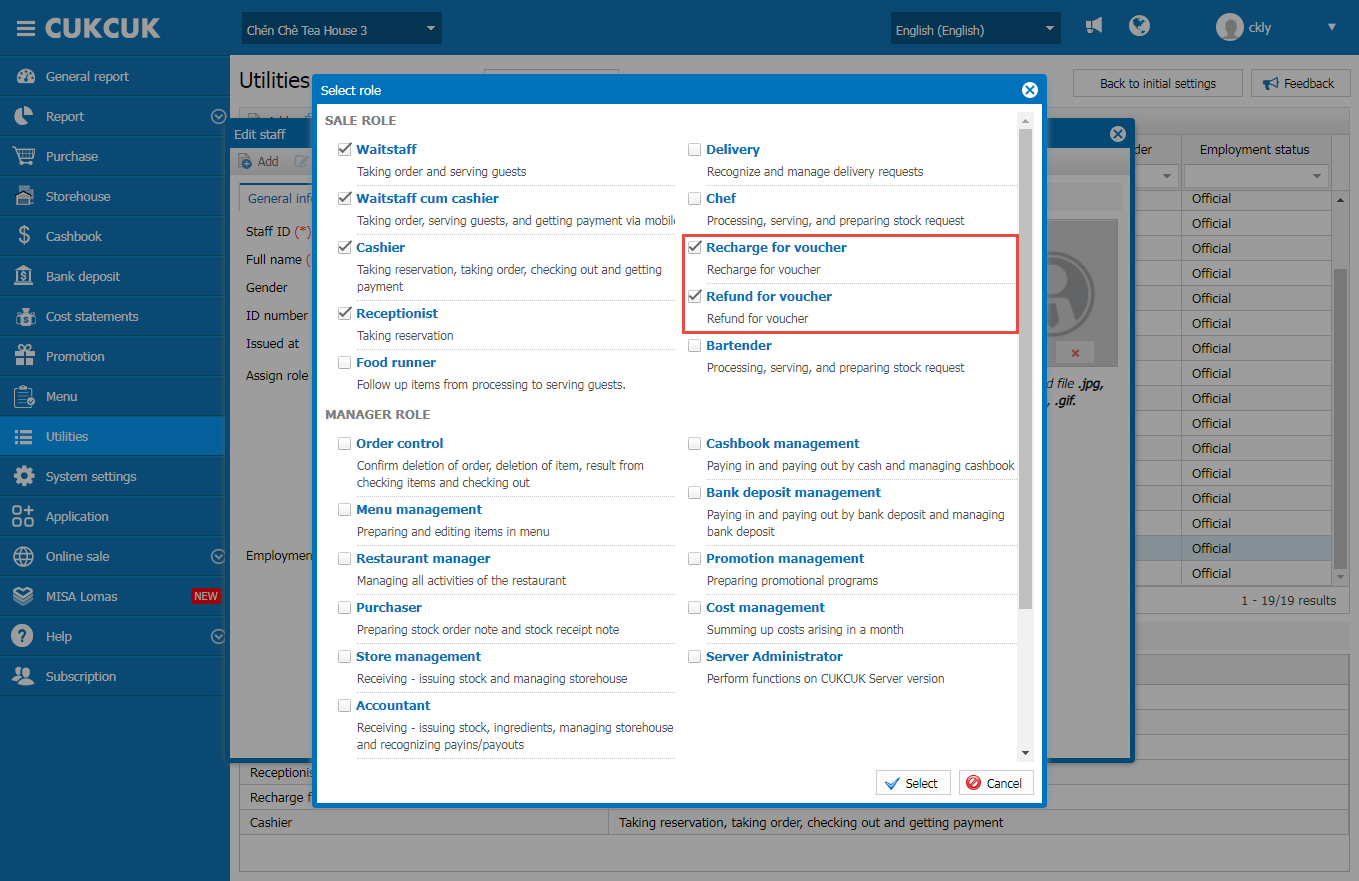
Step 3: Role
– Go to Utilities/Staff
– Select the employee(s) to assign role and click Edit
– Click on the icon![]()
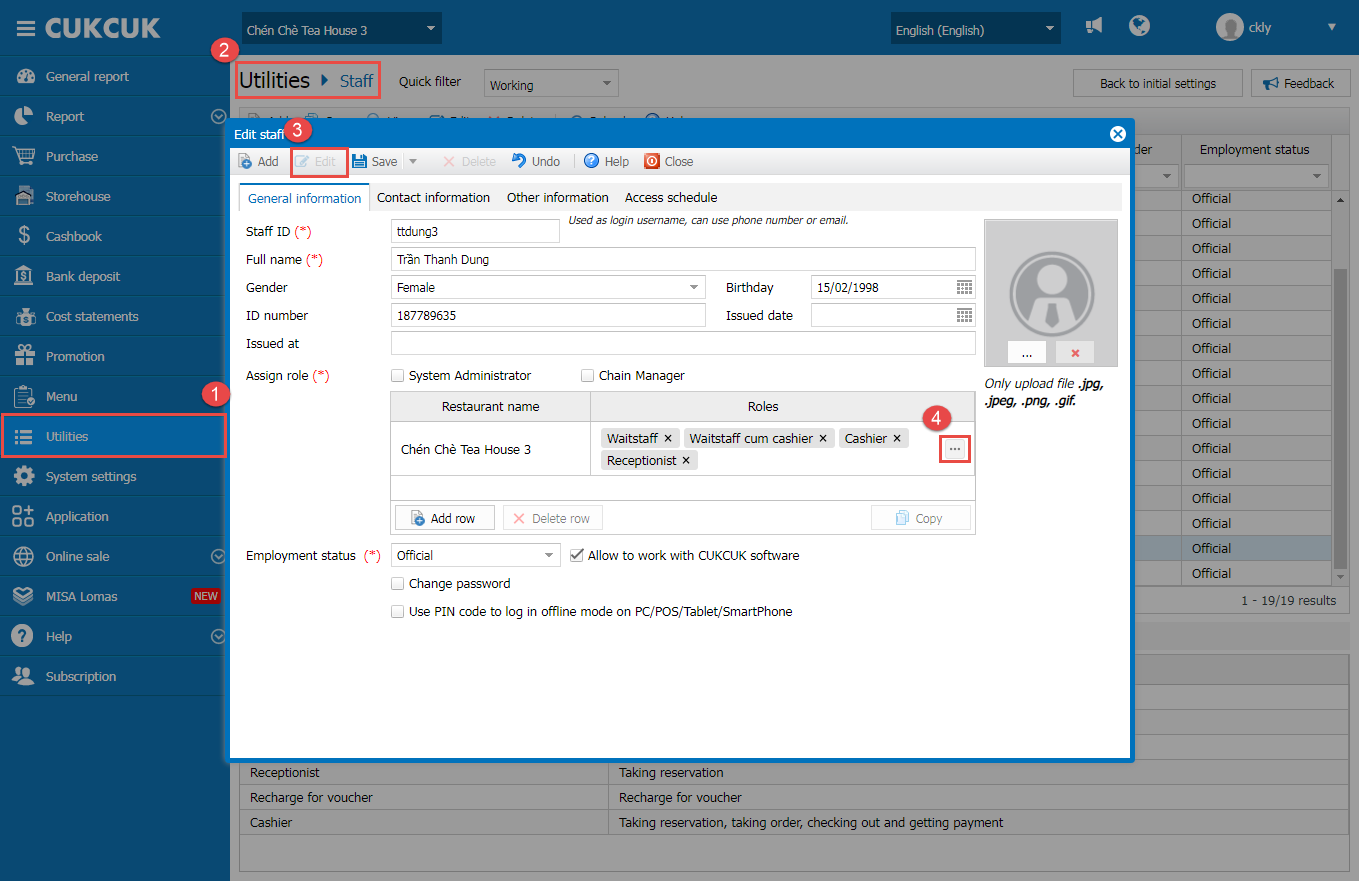
– Check Top up voucher, Refund voucher and click Select
Then, click Save
Moreover, the manager can add new employee and assign role. Please see instructions here.
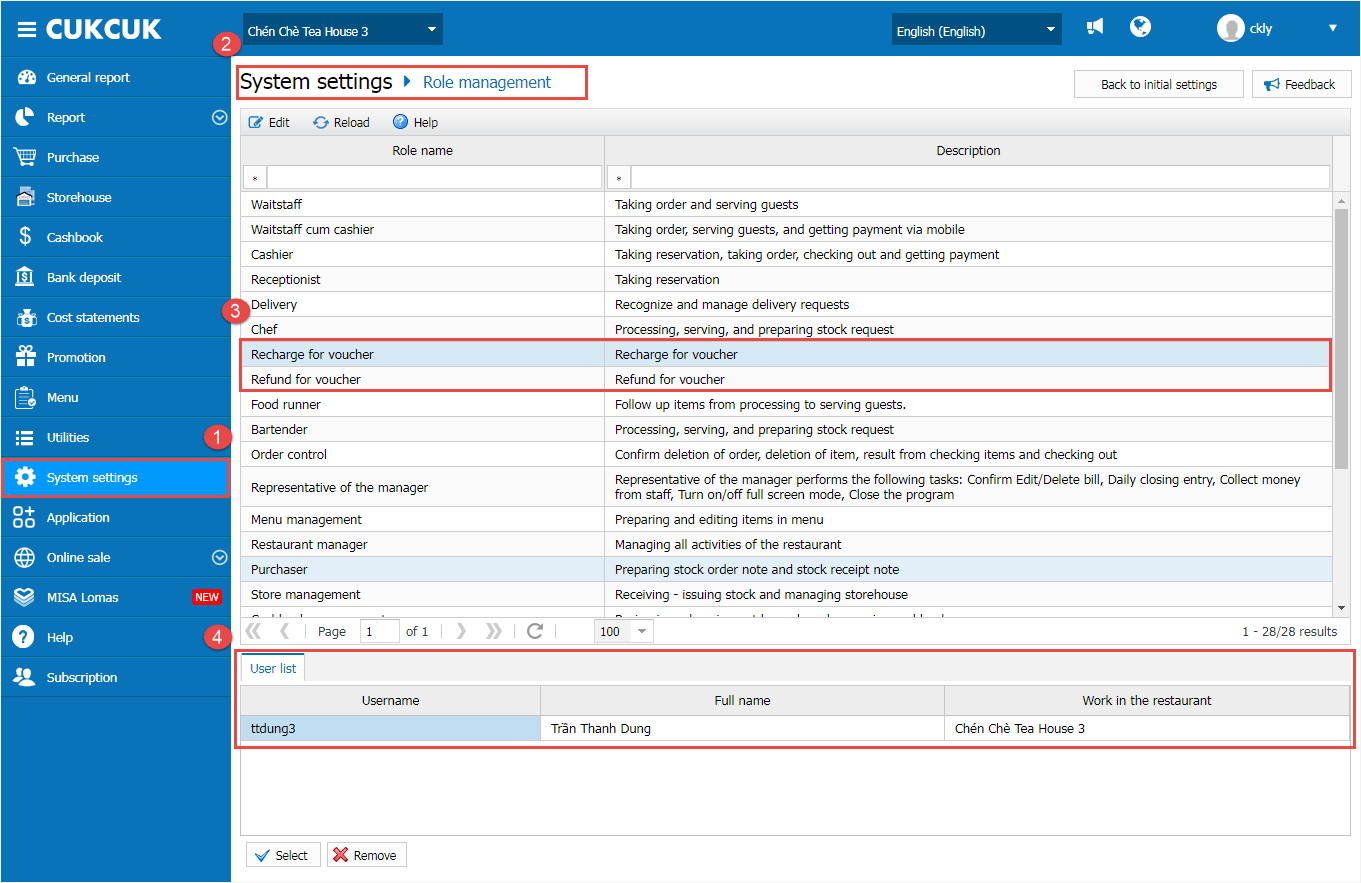
– After assigning role, the manager can go to System settings/Role management.
– Click on the role name Refund voucher, Top up voucher to check the assigned employees
Step 4: Top up voucher
To top up voucher, please follow these steps:
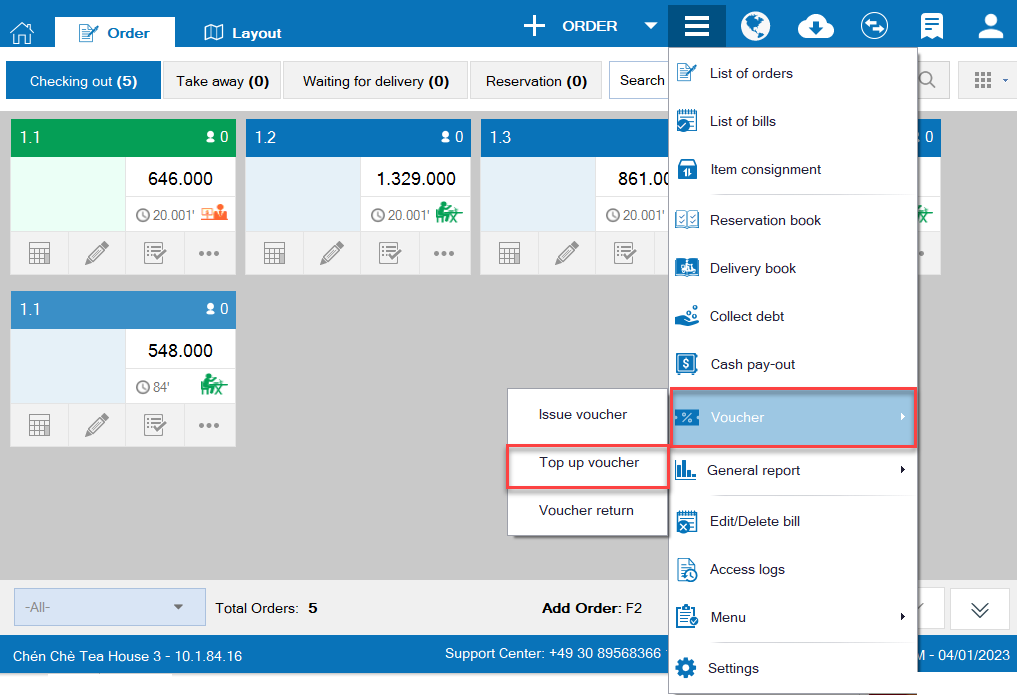
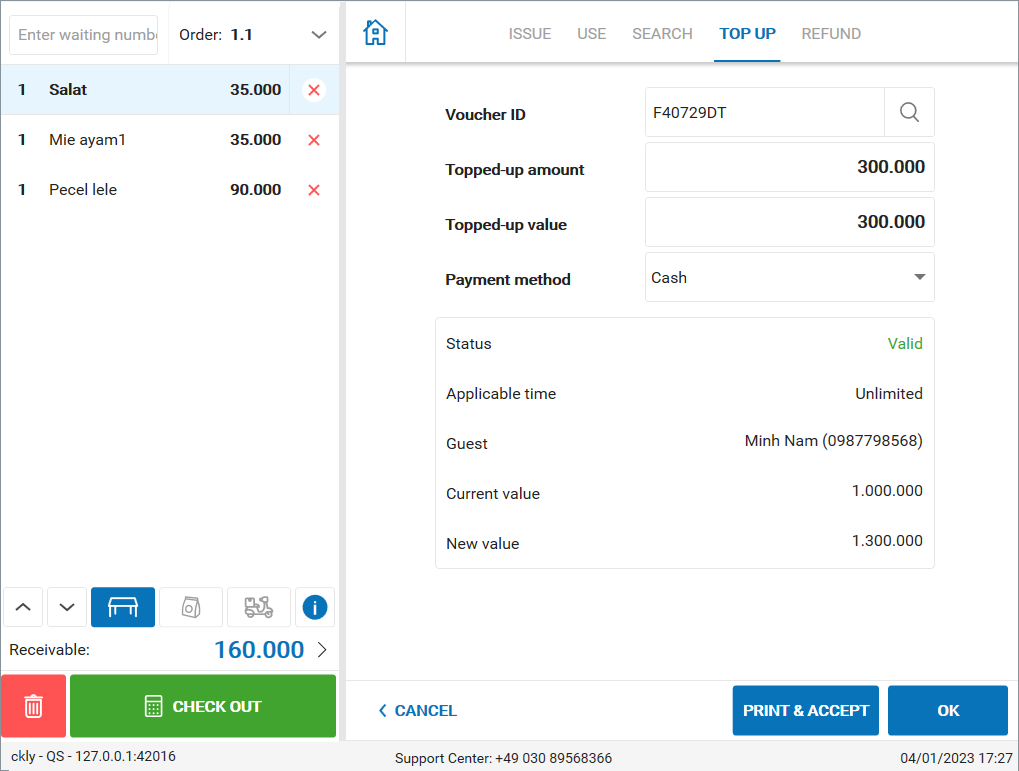
a. On PC
On PC, click on the icon![]() and select Voucher/Top up voucher
and select Voucher/Top up voucher
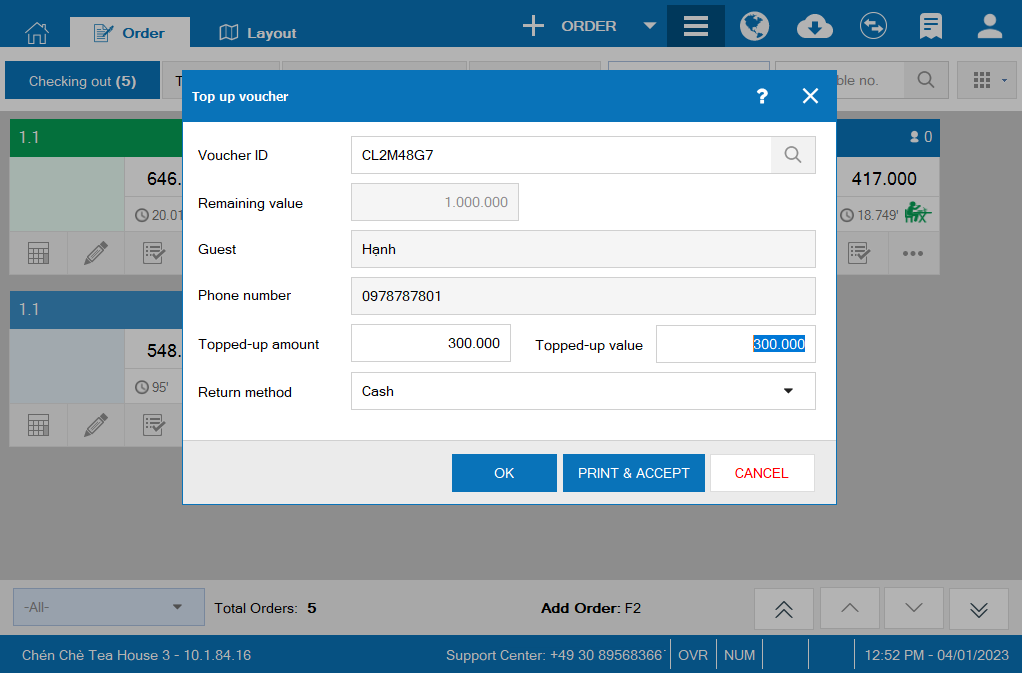
On Top up voucher screen, the cashier fills in information as the image below.
Then, click OK or Print and accept.
Note:
– Top up condition: only top up when the voucher is valid
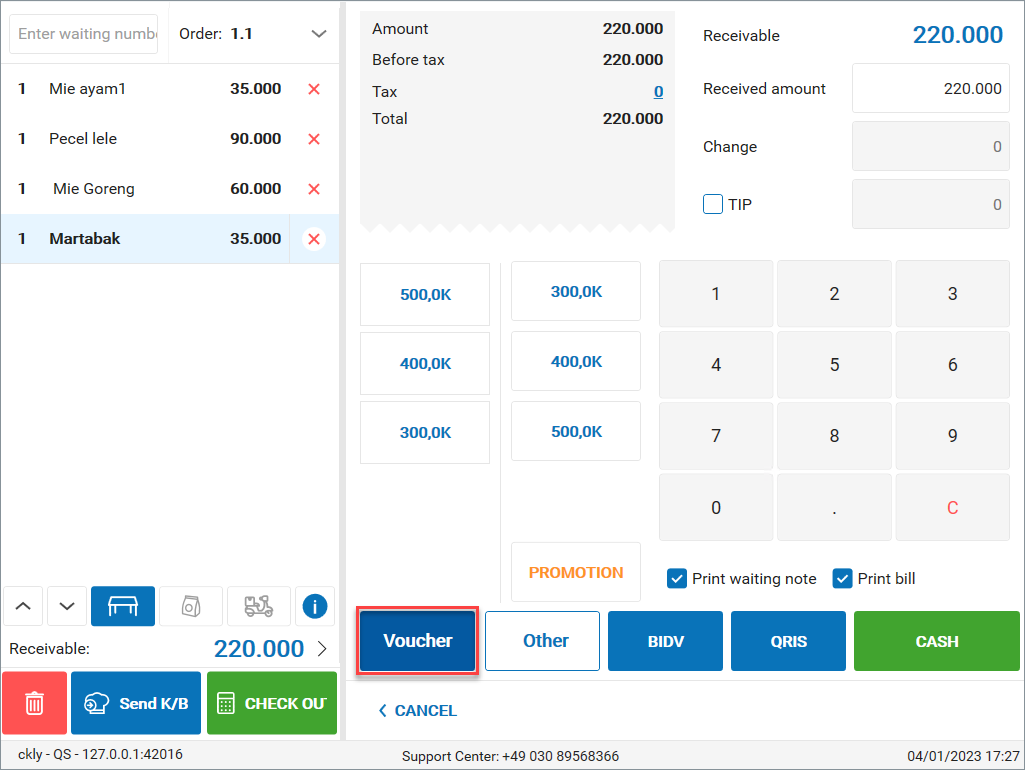
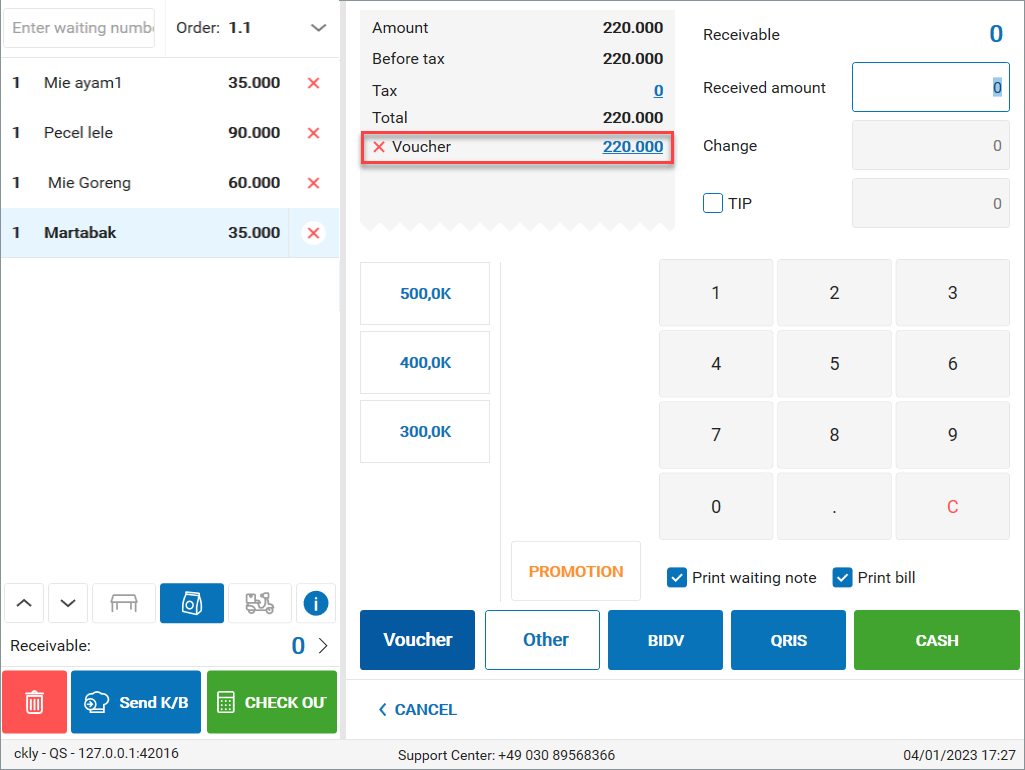
On PC/POS, voucher shall be applied as below:
Case 1: Voucher is issued before setting up to apply to the whole chain: it will only be used at the issuing branch.
Case 2: Voucher is issued after setting up to apply to the whole chain:
On check out screen, voucher is applied as in the image below.
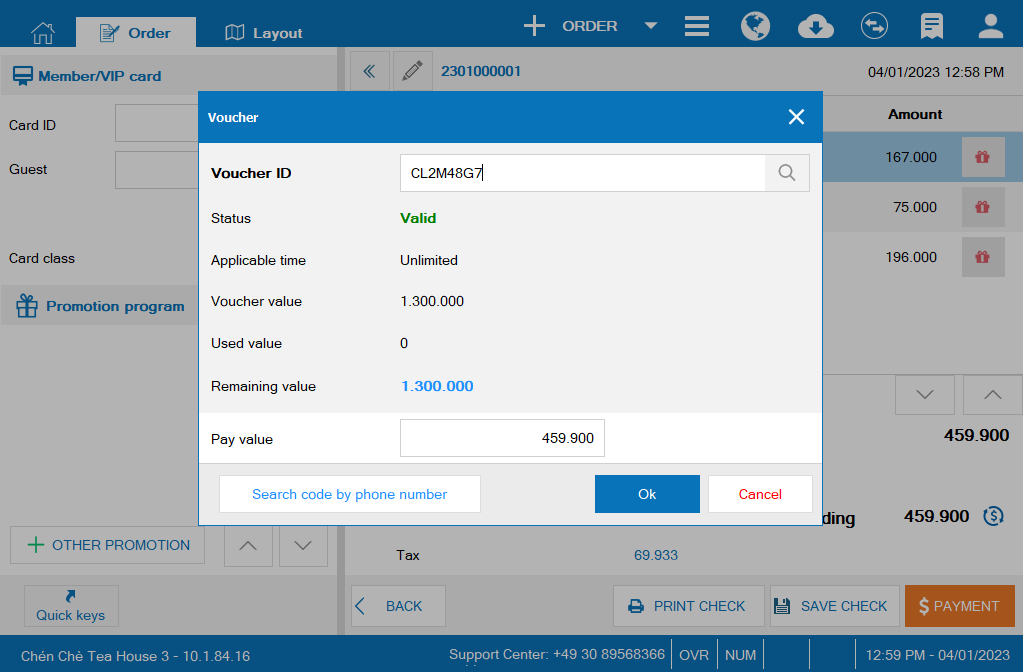
Note: The cashier can search voucher ID by phone number.
Then, click Payment to complete.

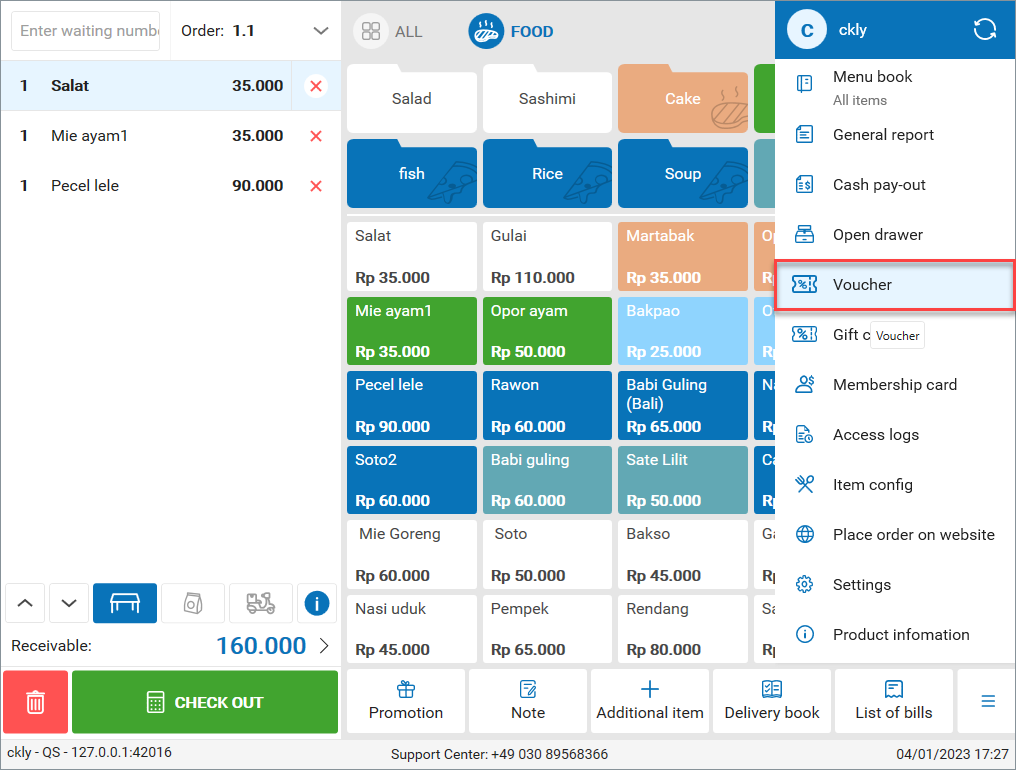
b. On Quick service version
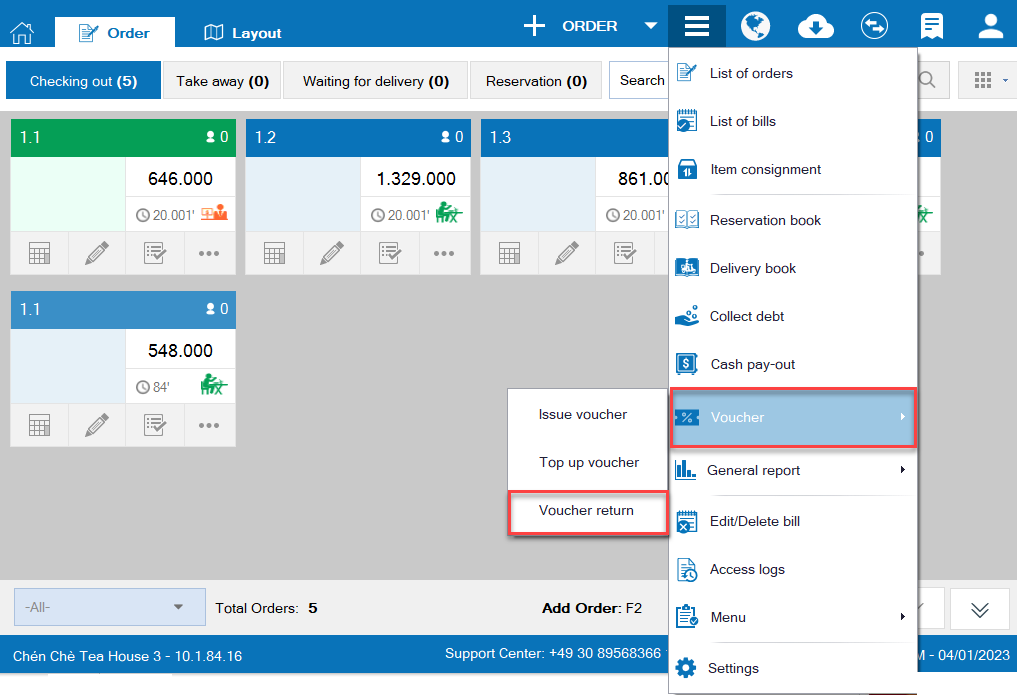
– Click on the icon![]() and select Voucher
and select Voucher
– Select Top up
– Click OK or Print & Accept to top up voucher
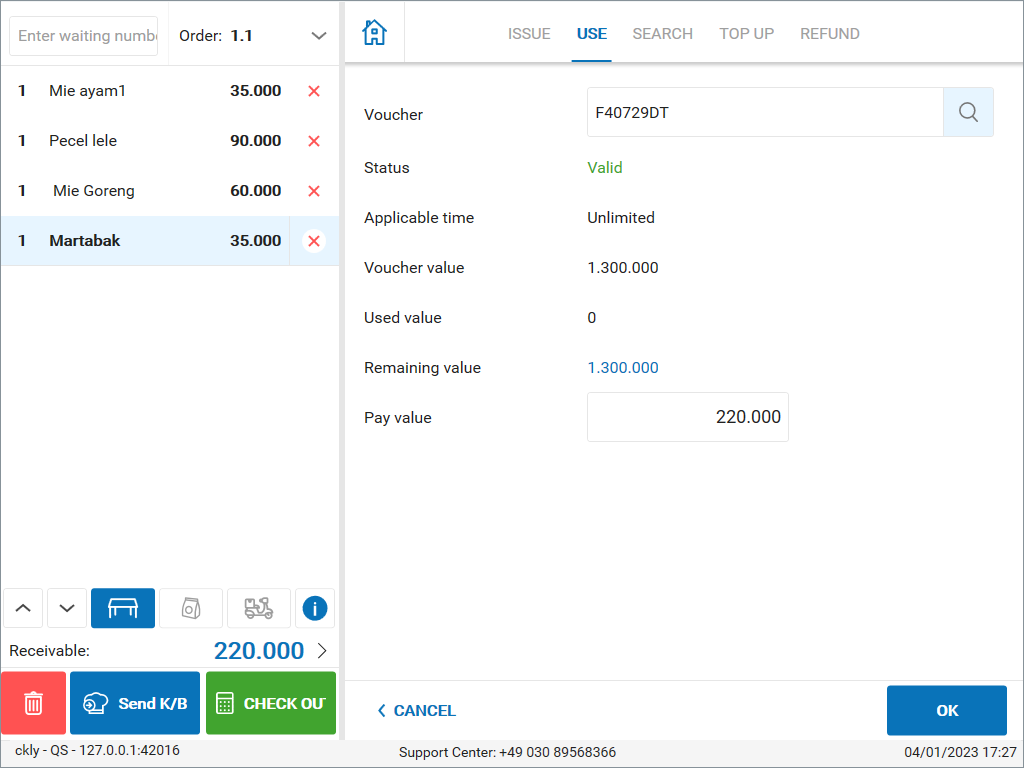
Enter voucher ID. Then, click on the icon![]() to search
to search
– Click OK to apply voucher
Step 5: Refund voucher
a. On PC
After successfully getting payment, with valid vouchers the cashier can proceed refund as follows:
On PC, click on the icon![]() and select Voucher/Refund voucher
and select Voucher/Refund voucher
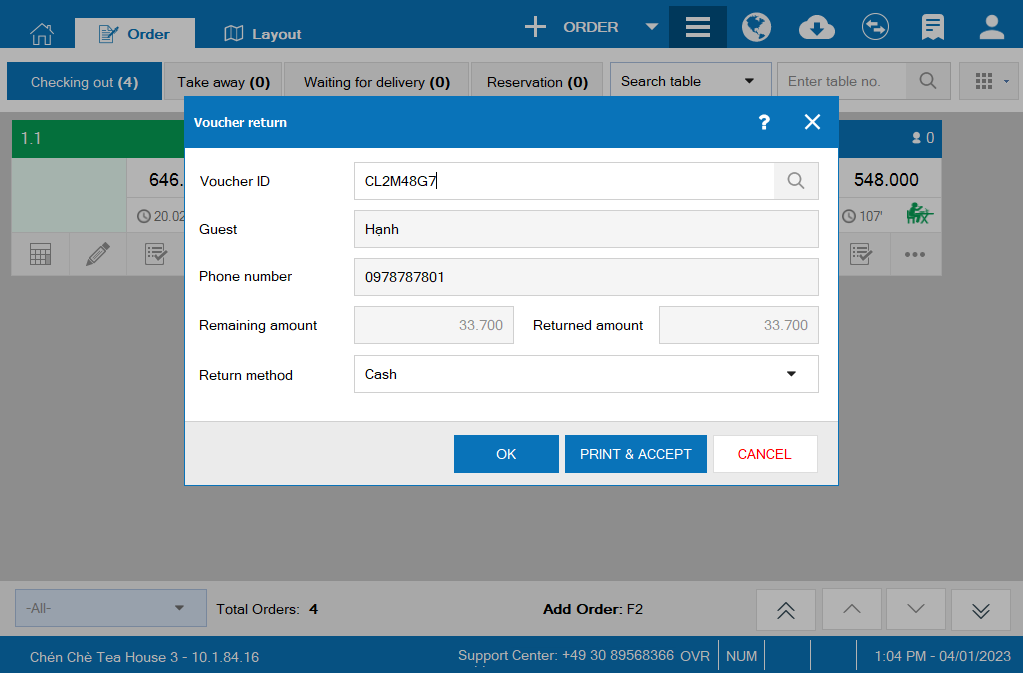
On Refund voucher screen, enter information as in the image below. Then, click OK or Print and accept to refund.
b. On Quick service version
– Click on the icon![]() and select Voucher
and select Voucher
– Select Top up and enter full information as in the image below.
– Click OK or Print and accept to refund voucher

Step 6: In the end of the day, the owner can check the usage of vouchers on the management page
On the management page:
– Go to Promotion and select Voucher/List of vouchers/Purchased
– Select time to view and click Load data
– Select Export to export the list of vouchers
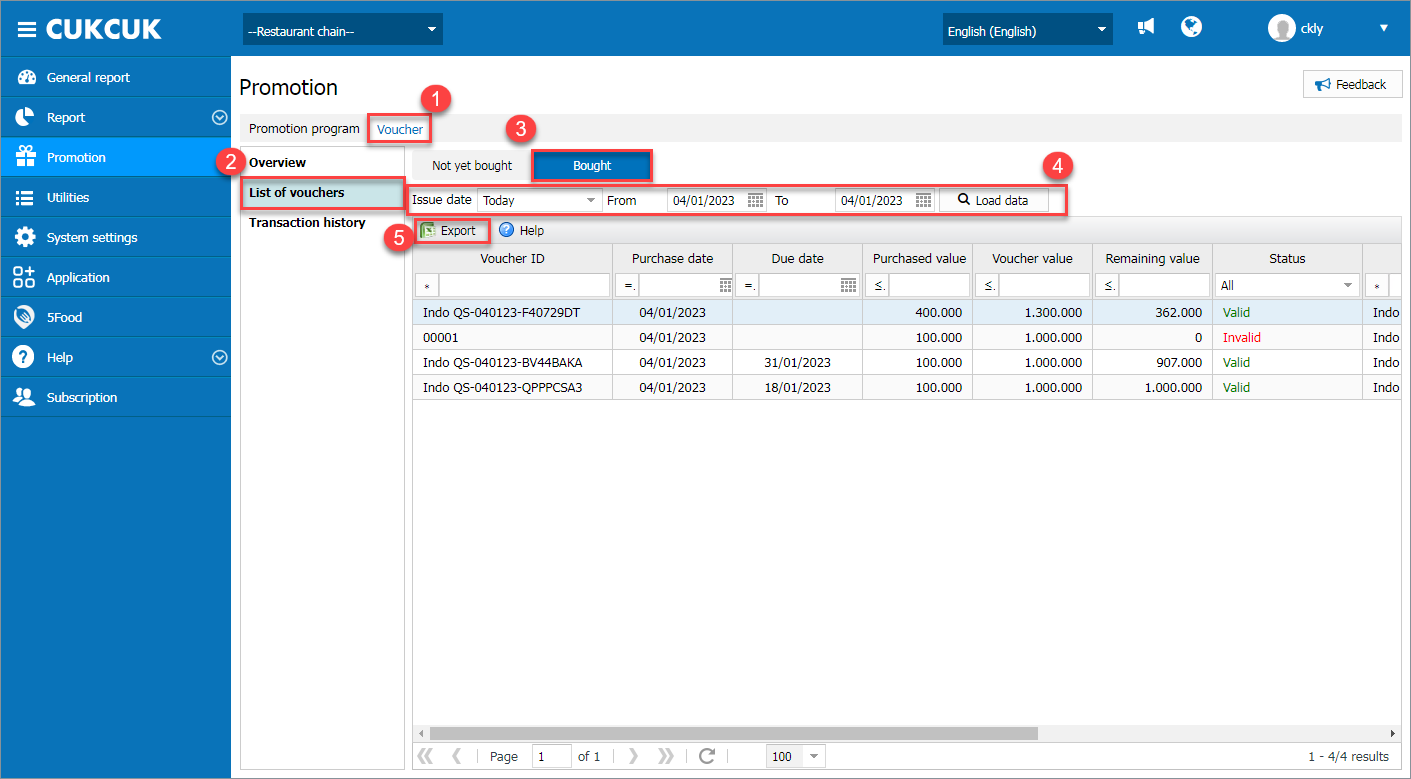
Here is the export template.

To view transaction history, on the management page:
– Go to Promotion and select Voucher/Transaction history
– Select time to view and click Load data
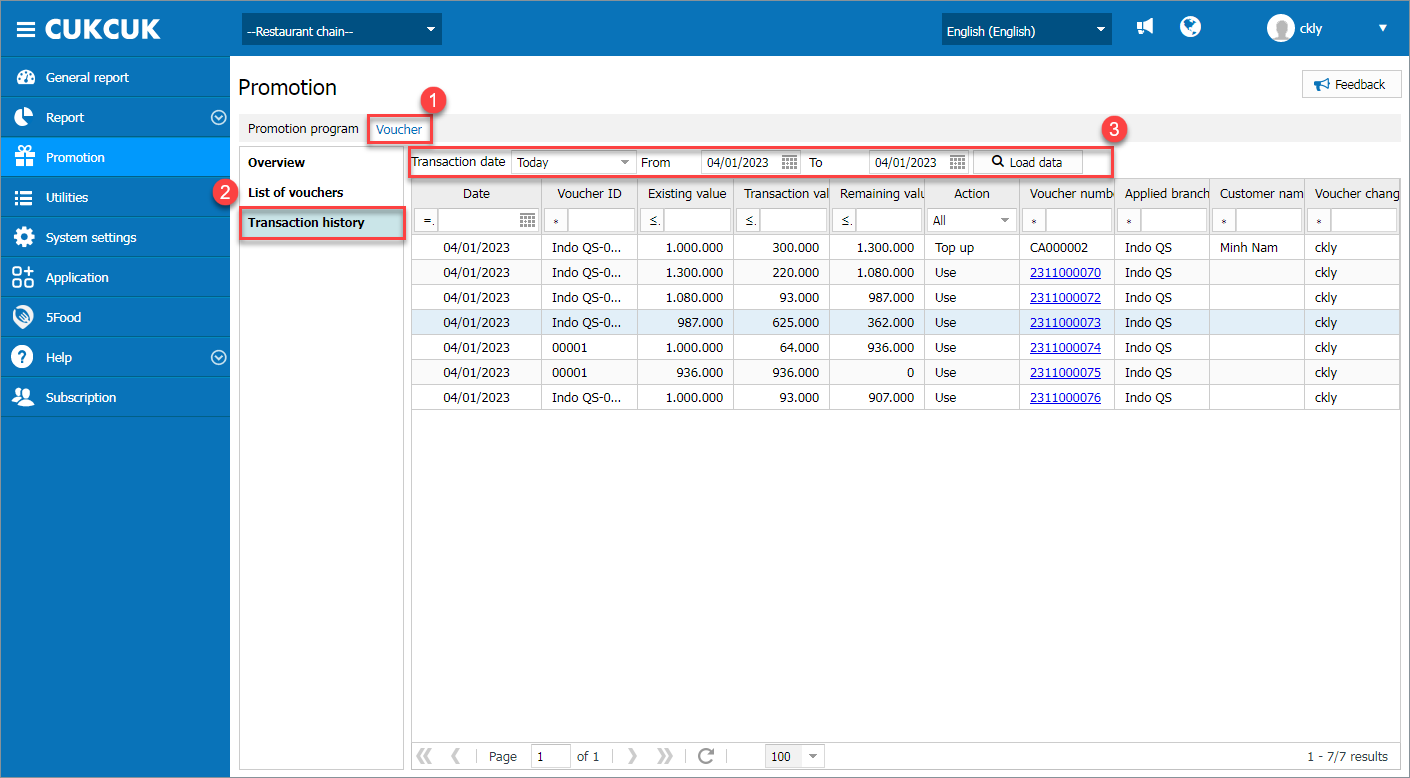
– To save bill information, select Export

To view voucher list, on the management page:
– Go to Report\Sales, select Voucher report
Select time and parameters to check and click OK
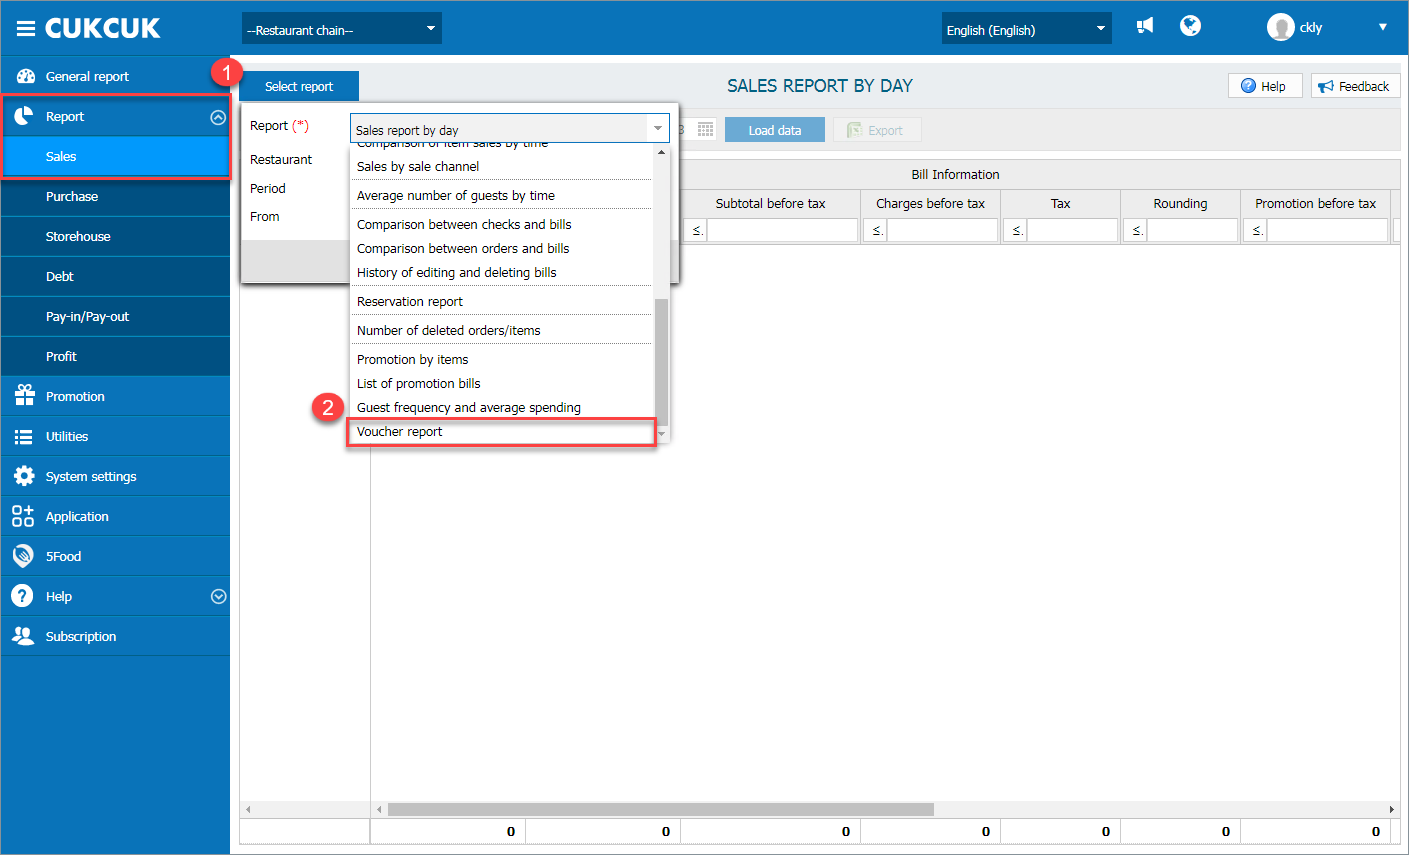
Here you can check the issuance, use and management of vouchers at each branch.
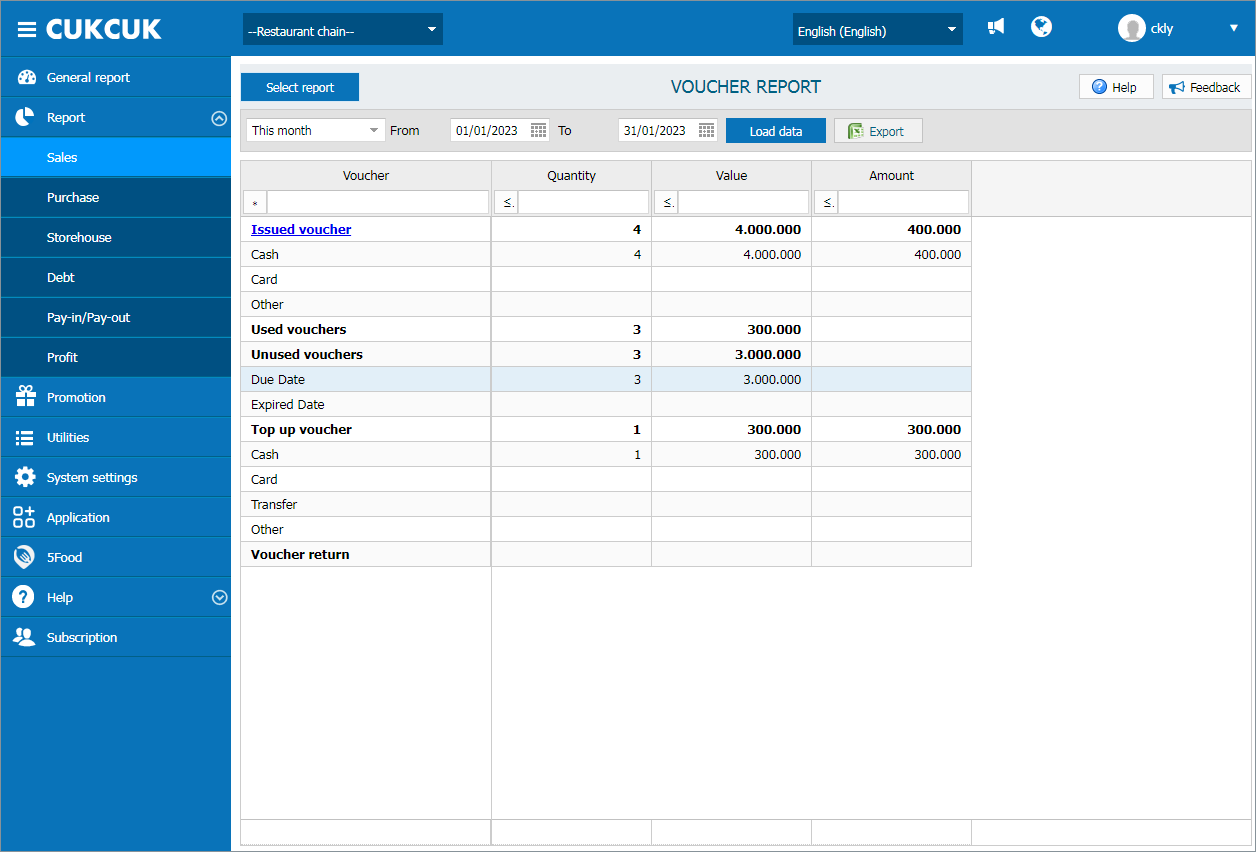
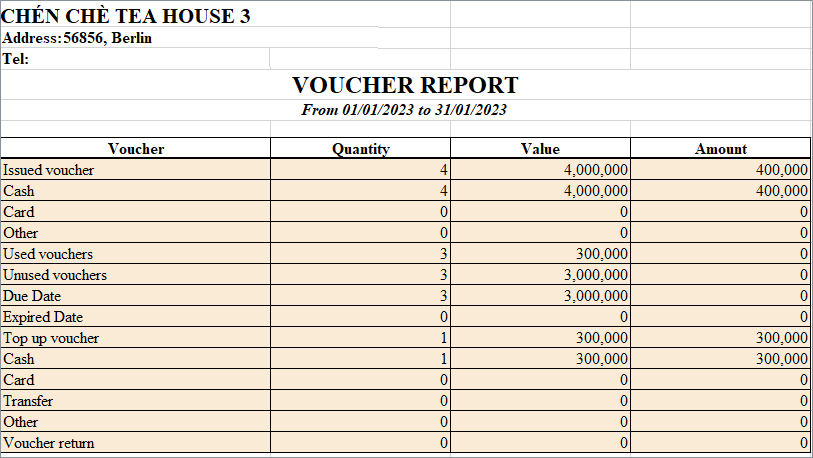
Here is voucher report template.
Have a nice day!
